


Öhlins Shock Absorber for MC Road & Track Manual.
- 26/10/2016
17,417 views

Öhlins Shock Absorber Design and Functioning
Most of Öhlins suspensions are a high pressure monotube type. The fluid is put under gas pressure and the gas and the fluid are kept apart by a separating piston. The piston is usually fitted in an external reservoir, connected by a hose (Fig. 4) or fixed directly on top of the shock absorber (Fig 3). In some models everything is fitted inside the main shock absorber (Fig 2). A few shock absorbers are of emulsion type, oil and gas mixed inside the shock absorber (Fig 1). Pressurisation of the fluid is made with nitrogen. The pressurisation prevents cavitation of the fluid and the shock absorbing action is therefore more even. The external reservoir also contributes to better cooling of the fluid, giving longer service life for the fluid as well as the components. Öhlins shock absorbers with external rebound adjustment have an integrated temperature compensation. As the temperature increases and the fluid flows more easily the flow is controlled accordingly. The shock absorbing effect is therefore independent of the temperature. The more advanced models permit individual adjustment of compression and rebound damping. Öhlins shock absorbers provide the possibility of adjustment, making them adaptable to most vehicles, drivers and ranges of use. All of the shock absorbers with springs have adjustable preload of the spring action.

Setting Up your Vehicle
Warning! Before riding, always ensure that the basic settings made by Öhlins are intact. Take notes, adjust in small steps and make only one adjustment at a time.
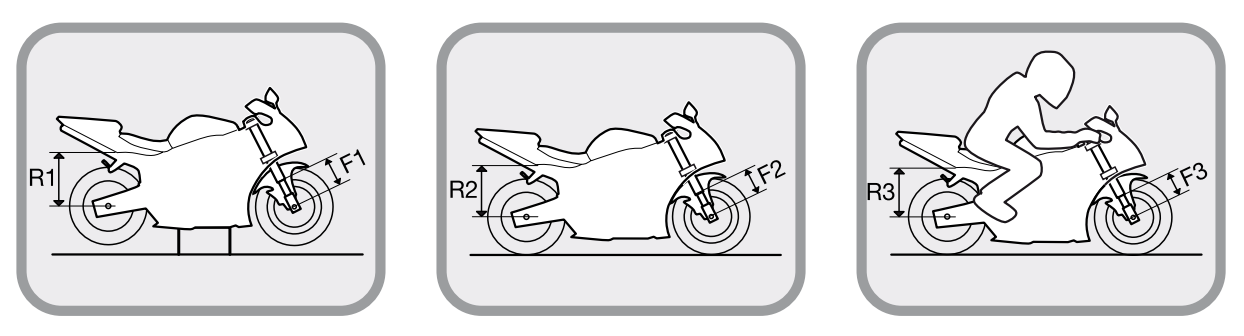
Step 1:
Spring Preload - Free Sag - Ride Height Spring preload is a crucial part of setting your motorcycle since it affects the height of the motorcycle and the fork angle.
Note! The following procedure should be performed on a flat surface.
- Put the motorcycle on a workstand so that both wheels are off the ground and the suspension is unloaded.
- Mark, for example with a piece of tape, a point immediately above the rear wheel axle.
- Measure the distance from the marked point to a fixed point, for example the wheel axle (R1).
- Measure the distance from the bottom of the upper triple clamp to a fixed point, for example the front wheel axle (F1).
- Put the motorcycle on the ground so that the front and the rear suspensions are slightly compressed. Repeat the measuring procedures (R2 and F2).
- Sit on the motorcycle in normal riding position, properly outfitted in your riding gear. Repeat the measuring procedure (R3 and F3).
Recommended Measures If no other recommendations are given in the Mounting Instructions follow the measures below:
Free sag (R1-R2), (F1-F2) Rear 5-15 mm Front 20-30 mm
Ride height (R1-R3), (F1-F3) Rear 25-35 mm Front 30-40 mm
Note! Always check on the Öhlins web site www.ohlins.com or with your Öhlins dealer/ distributor for the latest information.
Step 2:
Adjust spring preload
- If your measures differ significantly from the recommendations in the Mounting Instructions or the table above, adjust the spring preload. (See chapter Spring Preload in this manual).
- If the ride height still differs from the recommendations, you may need to change to softer/harder spring. Contact your Öhlins dealer for advise.
Warning! Incorrect spring rate may result in a front geometry that is either too steep or too flat. This can result in a tendency of under or over steering, that could seriously affect the handling characteristics of the motorcycle.
Spring Preload
When adjusting the spring preload you move the spring seat. This will decrease or increase the initial spring force, which will lower or raise the motorcycle rear ride height. The spring preload is fundamental for the function of the suspension. If the preload is incorrectly set, any other adjustments will not help to get the intended performance from the suspension. A B
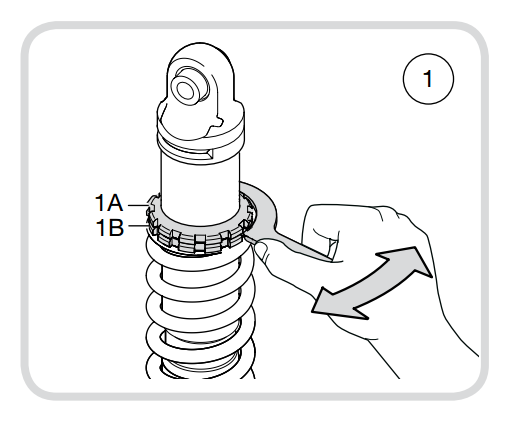
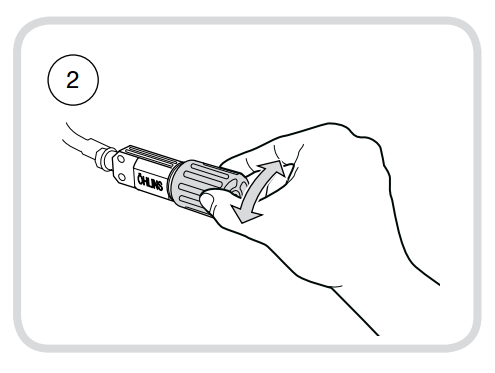
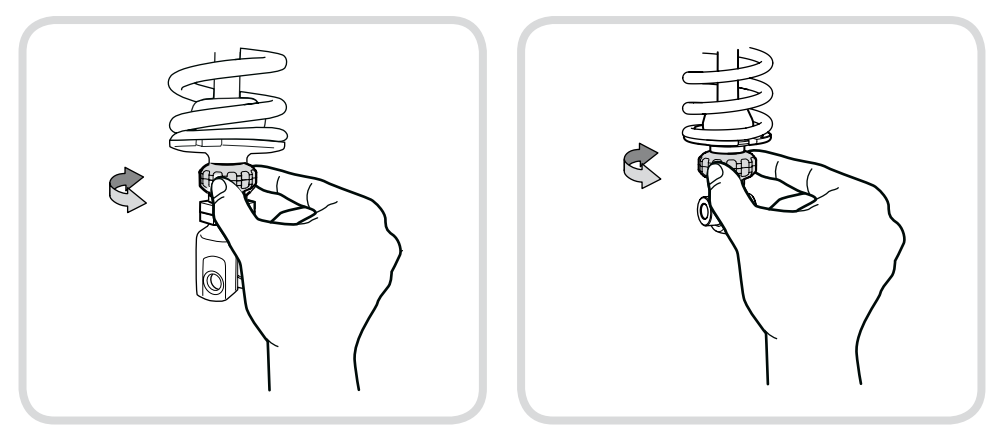
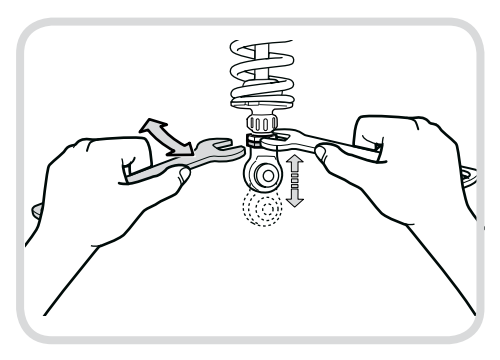
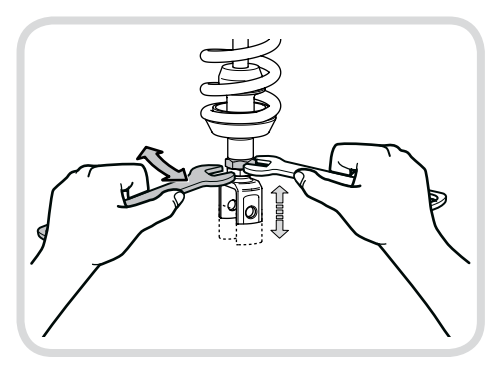
How to Set the Spring Preload
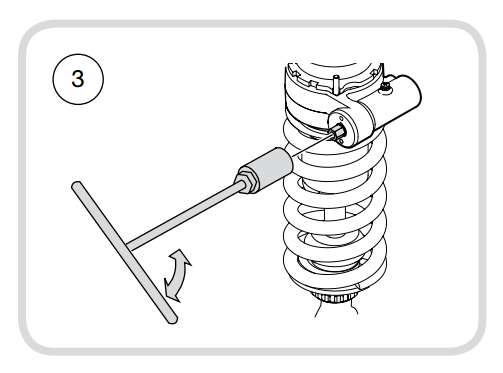
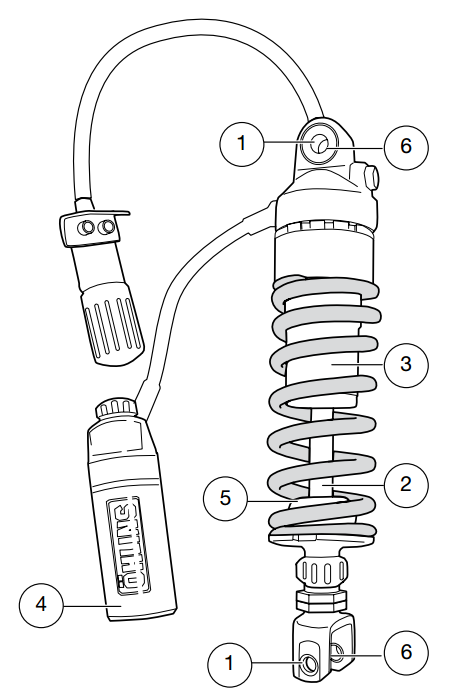
1 Mechanical Adjuster Use a C-spanner. Loosen the lock nut (1A). Move the lower spring platform (1B) to the desired position. Turn clockwise to increase the preload, turn counter clockwise to decrease it.
2 Hydraulic Adjuster Turn the Hydraulic Adjuster knob to set the spring preload. Turn clockwise to increase the preload and turn counter clockwise to decrease.
3 Integrated Hydraulic Adjuster Turn the hexagon screw on the hydraulic adjuster to set the spring preload. Turn clockwise to increase, turn counter clockwise to decrease.
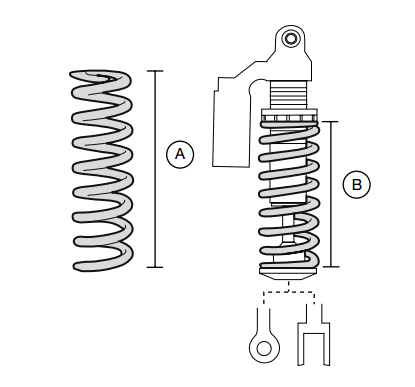
A Free spring length
B Installed spring length Shock absorber fully extended A - B = Spring Preload Spring Preload is the difference between the measures A and B.
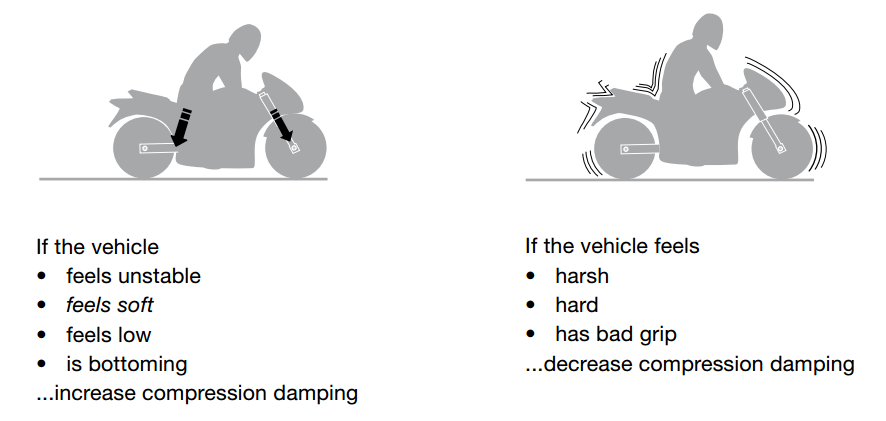
Compression Damping
Compression damping controls the energy absorption when the shock absorber is being compressed, thus controls how easy the shock absorber compresses when the rear wheel is being loaded or hits a bump. Compression Damping Adjuster
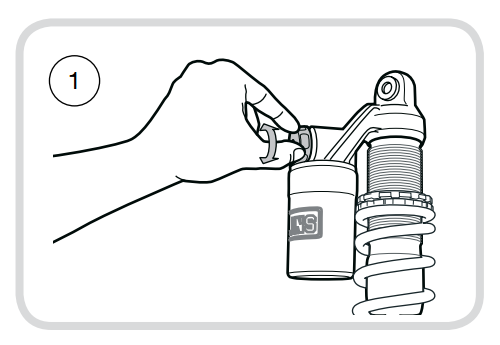
- Adjust by turning the knob on top of the reservoir. Turn clockwise to increase damping, turn counter clockwise to decrease.
- Adjust by turning the knob on top of the reservoir. Turn clockwise to increase damping, turn counter clockwise to decrease.
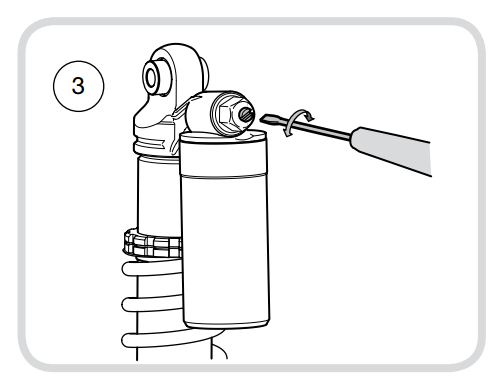
- Adjust on top of the reservoir. Turn the slotted screw clockwise to increase damping, turn counter clockwise to decrease.
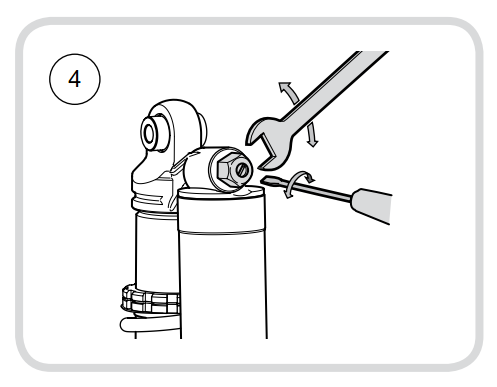
- Adjust on top of the reservoir. High speed: Turn the hexagon screw. Low speed: Turn the slotted centre screw. Turn clockwise to increase damping, turn counter clockwise to decrease.
Reset the adjuster Turn the adjuster clockwise to fully closed position (position zero [0]). Then, turn counter clockwise to open, and count the clicks until you reach the recommended number of clicks. See recommended Set-up data in the Mounting Instructions for the shock absorber.
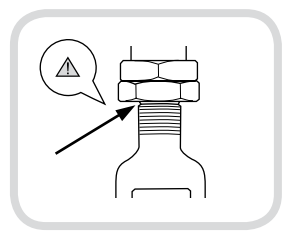
Caution! Do not use force, delicate sealing surfaces can be damaged.

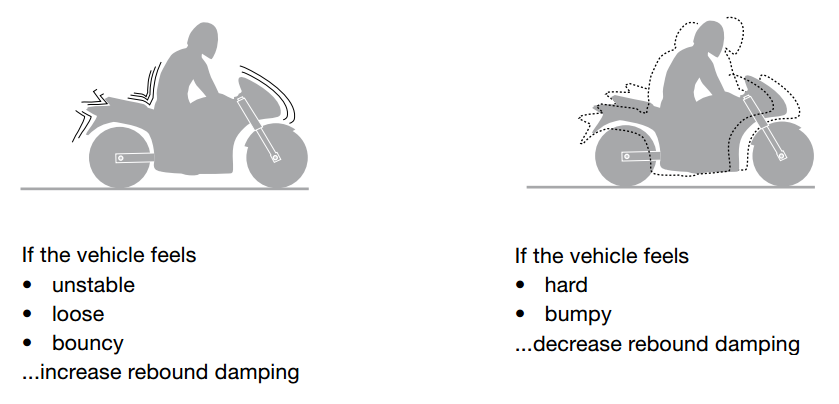
Rebound Damping
Rebound damping controls the energy absorption when the shock absorber is being extended and controls how fast the shock absorber returns to its normal position after being compressed.
Rebound Damping Adjuster Turn the wheel on the piston shaft above the end eye/bracket. Turn clockwise to increase damping, turn counter clockwise to decrease it.
Reset the adjuster Turn the adjuster clockwise to fully closed position (position zero [0]). Then, turn counter clockwise to open, and count the clicks until you reach the recommended number of clicks. See recommended Set-up data in the Mounting Instructions for the shock absorber.
Caution! Do not use force, delicate sealing surfaces can be damaged.
Adjust Length
By adjusting the length of the shock absorber the steering geometry as well as the chain force can be changed.
A shorter shock absorber will result in a lower motorcycle. The fork angle as well as the trail will increase, and normally the chain force will be reduced with less anti-squat as a result. A slight change of centre of gravity is another result of changing the length of the shock absorber.
A longer shock absorber will result in a higher motorcycle. The fork angle and trail will decrease and normally the chain force will increase with more anti-squat as a result. A slight change of centre of gravity is another result of changing the length of the shock absorber.
Note! On modern Hypersport and race bikes all length adjustment should be moderate. Also very small adjustments can make a big difference.
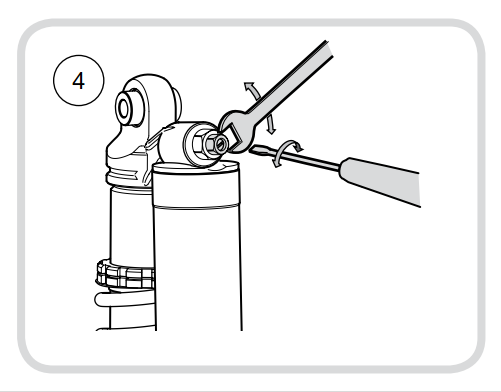
Adjust Length
We advise to remove the shock absorber from the vehicle before adjusting the length. Use two 24 mm wrenches. Hold the upper nut with one hand and at the same time loosen the lock nut (lower nut). Turn the end eye/bracket to the desired length. One [1] turn is 1 mm of shock absorber length. Please make sure to measure the ride height before and after adjusting the length (see chapter Setting Up your Vehicle). Tightening torque: 40 Nm
Warning! Remember to lock the lock nut after adjusting the length.
Warning! The adjustable end eye/bracket must not be threaded out more than that the groove is fully visible beneath the lock nut. This is maximum length. After adjusting, make sure that the lock nut is tightened.
Note! After adjusting the length, check the headlight angle of your vehicle.
Adjustment and Set-up
Recommended Adjustment Range Rebound and compression damping: ±5 clicks from original (basic) setting.
When you setup your bike you need to do it together with the front fork and on all types of tracks that you want to optimize, there are no setups that will be 100% perfect on all tracks, you will need to compromise.
Keep priority at:
- safe feeling
- stability
- comfort
This will allow you to ride safer and use less energy.
Rebound Damping If you have got a good feeling for the bike with spring, preload and the ride height feels ok but the bike runs low and packs down under acceleration bumps, with lost line and/or lost comfort and traction, open the rebound adjuster two [2] clicks.
If the bike is nervous and moving a lot or has a high feeling entering corners, close the rebound adjuster two [2] clicks. Fine tune one [1] click at the time.
Test run and make the necessary adjustments. For original rebound setting see the Mounting Instructions for your shock absorber.
Compression Damping
If the bike feels soft, unstable, is using to much wheel travel and you have the perfect spring for you; close the compression adjuster two [2] clicks. This will control the wheel during acceleration more, plus, it will help ride height and falling through the stroke too quickly.
If the bike feels high, has bad grip at throttle opening and feels unsmooth over small or medium bumps during acceleration; open the compression adjuster two [2] clicks. Test run and make necessary corrections.
When you have sufficient feel of the motorcycle you can make further fine adjustments. It is feeling and experience that counts.
When you feel that you have achieved an improvement, go back to where you started and check once more. Note other relevant factors such as tires, temperature etc. Test run to make sure whether further fine adjustments should be made.
Inspection and Maintenance
Preventive maintenance and regular inspection reduces the risk of functional disturbance. If there is any need for additional service, please contact an authorized Öhlins workshop.
Cleaning Clean the shock absorber externally with a soft detergent. Use compressed air. Be careful that all dirt is removed. Lift the bump rubber and clean the area below. Keep the shock absorber clean and spray it with oil (WD40, CRC 5-56 or equivalent) after washing. Wipe off excessive oil with a cloth.
Caution! Never spray water directly into the adjuster knobs and/or the ball joints.
Inspection
- Check ball joints for possible excessive play or stiction.
- Check the piston shaft for leakage and damage.
- Check the shock absorber body for external damage.
- Check the reservoir for external damage that can restrict the floating piston from moving freely.
- Check for excessive wear of rubber components.
- Check the attachment points of the shock absorber to the vehicle.
Recommended Service Intervals
Racing: Every 10 hours of operation. Maximum 20 hours of operation without service and oil change.
Regular street use: Every 30 000 km
Disposal Discarded Öhlins products should be handed over to an authorized Öhlins workshop or distributor for proper disposal.
Note! Use only Öhlins Shock Absorber Fluid. Contact your Öhlins dealer for advise.
Warning! Do not change the gas pressure. Special purpose charging equipment and access to nitrogen is required.
Thanks Information: Ohlinsasia
โปรโมชั่นสินค้าราคาพิเศษประจำสัปดาห์

Related post


Flagship YZF-R1 Captures Fourth Design Accolade
YAMAHA Will Release the 2017 MT03 & MT25, the Lightweight Model of Its MT Series, on Dec 15

Top Ranking Views
-
 Estimated Price Honda CBR250RR Two Cylinder
 - เทคนิคการขูดชามไล่เม็ด สำหรับรถออโต้ กับ Webike โมโตเทคนิค
- Differentiating the Classic last 5 HONDA CB250
- Honda PCX 125 2017 officially launched
- Honda, limited edition of the “PCX Special Edition” and “PCX150 Special Edition” of special specification
- มอเตอร์ไซค์สไตล์วินเทจกับสิ่งที่คุณต้องรู้ก่อนคิดจะซื้อ
- เม็ดเดิม เม็ดแต่ง ต่างกันอย่างไร แบบไหนดีกว่า? Webike โมโตเทคนิค EP.2!!
- วิธีการเลือกน้ำมันเครื่องให้เหมาะกับมอเตอร์ไซค์ของคุณ | Webike โมโตเทคนิค EP.6
- 5 อันดับหมวกกันน็อคที่ปลอดภัยที่สุดในปี 2017
- Kawasaki อำลา ER พร้อมเปิดตัว 650cc ใหม่สองรุ่น Ninja 650 / Z650!


.jpg)

.jpg)
